
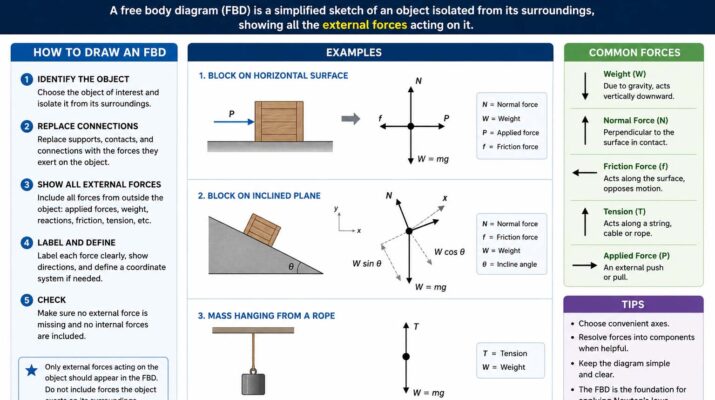
A free body diagram is a useful tool in physics, engineering, robotics, and technology education. It helps students, engineers, and developers visualize the external forces acting on an object in a simple, organized way.
Whether you are learning mechanics, building robots, studying physics, or working with engineering software, understanding these diagrams makes force problems easier to analyze. For example, engineers use force analysis when studying machines, structures, vehicles, and robotic systems.
What Is a Free Body Diagram?
A free body diagram is a simplified representation of an object or system and the external forces acting on it. First, you isolate the object from its surroundings. Then, you represent each relevant external force with a vector arrow.
In many diagrams, a simple box, circle, or point represents the object. Arrows show the direction of individual forces. Depending on the problem, their relative lengths may also indicate force magnitude.
Typical forces include:
- Gravity or weight
- Friction
- Tension
- Applied force
- Air resistance or drag
- Normal force
- Spring force
Therefore, the main purpose of the diagram is to organize force information before you apply physics equations.
Free Body Diagram Physics Basics
In free body diagram physics, these drawings help students apply Newton’s laws of motion to real situations. Instead of analyzing every detail in the surrounding environment, you isolate one object or system and identify the external forces acting on it.
For example, consider a box resting on a horizontal table. Earth’s gravity pulls the box downward. Meanwhile, the table exerts an upward normal force. If the box remains at rest and no other vertical forces act on it, those vertical forces balance.
Newton’s second law provides the central relationship:
Fnet = ma
Here, Fnet represents the net external force, m represents mass, and a represents acceleration. Therefore, you should identify the individual external forces first and then calculate their vector sum when solving the problem.
Students can also benefit from understanding what is dimensional analysis when working with physics equations, units, and formulas.
Why Force Diagrams Matter in Technology
These diagrams are not limited to introductory classroom exercises. Engineers use the same force-analysis principles when studying mechanical and structural systems.
For instance, mechanical engineers may analyze forces acting on machine components. Robotics engineers also need to understand forces and moments when studying robotic movement, contact, and balance.
Similarly, aerospace problems can involve forces such as lift, weight, thrust, and drag. Computer simulations can then model how those forces affect a system under specific conditions.
Because of these applications, force analysis remains valuable for students entering STEM and technology careers. Those exploring computer engineering vs computer science may also encounter mechanics in engineering-focused courses.
How to Create a Free Body Diagram
Learning how to create a free body diagram becomes easier when you follow a consistent process. OpenStax’s guide to drawing free-body diagrams explains the basic rules, including the need to show the external forces acting on the selected object or system.
Step 1: Identify the Object
First, choose the object or system you want to analyze. Clearly deciding what belongs to the system helps you distinguish relevant external forces from forces that should not appear.
Step 2: Draw a Simple Representation
Next, represent the object with a simple box, circle, or point. You do not need to create a detailed drawing because the diagram focuses on forces rather than appearance.
Step 3: Identify All External Forces
Then, determine which external forces act on the selected object. Depending on the situation, these may include gravity, friction, tension, normal force, spring force, or an applied push or pull.
Step 4: Draw Force Arrows
After identifying the forces, draw an arrow for each one. The arrow direction should match the direction in which that force acts.
When magnitude information is useful, relative arrow lengths can also show which forces are stronger or weaker.
Step 5: Label Each Force
Finally, label every vector clearly. For example, you might use labels for:
- Weight
- Normal force
- Friction
- Tension
- Applied force
As a result, the finished diagram provides an organized starting point for writing force equations.
Free Body Diagram Examples
Studying free body diagram examples helps beginners connect abstract physics concepts with familiar situations.
Box on a Table
Consider a box resting on a horizontal table. Gravity acts downward on the box, while the table exerts an upward normal force.
If no other vertical forces act and the box has no vertical acceleration, these forces balance. Therefore, the net vertical force equals zero.
Hanging Lamp
A stationary lamp hanging from a rope experiences its weight downward. Meanwhile, the rope exerts tension upward.
If the lamp remains at rest, the net force equals zero. Consequently, the upward and downward forces balance.
Car Moving on a Road
A car can experience several forces at the same time. For example, gravity acts downward, while the road provides an upward normal force.
In the horizontal direction, tire-road interaction can provide the force that accelerates the vehicle. Meanwhile, resistive forces such as aerodynamic drag may oppose its motion.
Sliding Object
Suppose an object slides across a horizontal surface. Gravity acts downward, while the normal force acts upward. In addition, kinetic friction acts along the surface in a direction that opposes the relative sliding motion.
Therefore, the diagram allows you to separate horizontal and vertical forces before applying Newton’s laws.
Common Mistakes in Free Body Diagrams
Beginners often make several mistakes when drawing force diagrams. However, a systematic approach can prevent most of them.
One common mistake is including a force that does not actually act on the selected object. For example, students sometimes include both members of a Newton’s third-law force pair on a diagram for one object. Instead, the diagram should contain only forces acting on the selected system.
Another common mistake is forgetting an external force. A box on a table, for instance, normally experiences both its weight and a normal force from the surface.
Incorrect arrow directions can also cause problems. Because forces are vectors, direction directly affects the equations that follow.
Finally, do not draw velocity or acceleration as if they were forces. They describe motion, but they are not force vectors.
Comparing Free Body Diagrams and Motion Diagrams
Although the two diagram types can appear in the same mechanics problem, they serve different purposes.
| Feature | Free Body Diagram | Motion Diagram |
|---|---|---|
| Main focus | External forces | Motion |
| Main use | Force analysis | Tracking changes in motion |
| Typical arrows | Force vectors | Velocity or acceleration vectors |
| Common topic | Dynamics | Kinematics |
A force diagram helps explain which forces act on an object. In contrast, a motion diagram represents how the object’s position or motion changes over time.
Therefore, students should not treat the two diagrams as interchangeable. Instead, they can use them together when a problem requires both motion and force analysis.
Troubleshooting Force Diagram Problems
Students sometimes struggle even after learning the basic drawing process. In that case, a few checks can make errors easier to identify.
Double-Check Force Directions
First, inspect every arrow. Ask what object or interaction produces each force and in which direction that force acts.
Verify Force Types
Next, identify each interaction. For example, determine whether a contact produces normal force, friction, tension, or another force.
Isolate One System Clearly
Also, define the object or system before drawing the vectors. If the system boundary changes, the set of external forces may change as well.
Choose Consistent Axes
For many problems, defining x- and y-axes simplifies the equations. On an incline, for example, choosing one axis parallel to the slope can make the analysis easier.
Use Consistent Units
When you move from the diagram to calculations, use compatible units. This step reduces avoidable errors in physics equations.
Simplify Complex Systems
Finally, break a complicated setup into individual objects when necessary. You can draw a separate diagram for each object and analyze the interactions systematically.
Technology Tools for Learning Force Analysis
Digital tools can make mechanics more interactive. Students can use physics simulations, online whiteboards, engineering programs, and educational platforms to visualize forces and test different situations.
For example, a simulation can let students change mass, applied force, or friction and then observe how the system responds. Consequently, learners can connect equations with visual behavior.
However, software does not replace an understanding of the underlying physics. A simulation produces more useful results when the user can identify the relevant forces and interpret them correctly.
Learning basic coding concepts can also help students understand how software represents variables, calculations, and simulated physical systems.
Applications in Real-World Engineering
Force analysis plays an important role across many engineering fields. Civil engineers, for example, study loads and forces when analyzing structures. Mechanical engineers examine forces in machines, components, and moving systems.
Similarly, automotive engineers study forces related to acceleration, braking, tires, and suspension. Aerospace engineers analyze forces on aircraft and other vehicles.
In robotics, engineers must consider forces when designing manipulators, mobile robots, and balancing systems. This work often overlaps with what is mechatronics, where mechanical, electrical, and software systems work together.
Game and simulation developers may also model forces to create believable object movement. However, real-time game physics may use approximations depending on performance and design requirements.
This broad range of applications explains why force analysis remains fundamental in technology education. Students interested in what do engineers do will encounter related concepts across many engineering disciplines.
FAQ About Free Body Diagrams
What is a free body diagram?
A free body diagram is a simplified representation of an object or system that shows the external forces acting on it as vectors.
Why are free body diagrams important?
They organize force information before calculations. Therefore, they help students and engineers apply Newton’s laws more systematically.
What forces are commonly shown?
Common examples include weight, normal force, friction, tension, spring force, drag, and applied forces. However, the exact forces depend on the physical situation.
Are free body diagrams used in engineering?
Yes. Engineers use force analysis throughout mechanics and related fields. For example, mechanical, civil, aerospace, and robotics problems often require engineers to identify and calculate forces.
What is the difference between a motion diagram and a free body diagram?
A motion diagram represents how an object’s motion changes. In contrast, a free body diagram identifies the external forces acting on the selected object or system.
Conclusion
A free body diagram remains one of the most useful tools for learning and applying mechanics. From introductory physics problems to engineering analysis, it provides a clear way to identify external forces before applying mathematical equations.
By isolating the correct object, identifying each external force, drawing accurate vectors, and labeling them clearly, students can approach mechanics problems more systematically. As a result, understanding these diagrams builds a strong foundation for Newton’s laws, force analysis, engineering, robotics, and other technology-related fields.